• ”my
    Award Winning Recipe Blogs - BlogCatalog Blog Directory
  • myTaste.com
  • Proud member of FoodBlogs
  • Strawberry Shortcake

    While we’re not quite at that time of year here in Maine, it is that time … STRAWBERRIES! I love strawberries just hulled and sliced with a bit of sugar and balsamic vinegar. Though I have made Dark Chocolate Strawberry Ice Cream and Strawberry Limeade, if I had to add strawberries to a recipe, my all time fav would be Strawberry Shortcake.

    When Fantastical Food Fight announced April’s spatula down to be Strawberry Shortcake I was delighted! I changed up my Grandmother’s Biscuits a tiny bit to make them sweet, not savory and simply sliced up some strawberries and let them macerate for a while.

    Traditionally you would serve these beauties with whipped cream. I have not been able to bear the sight of schlag on my food since … well, let’s just say, Vermont, a loss of power, whipped cream and a pumpkin pie. Gives me the willies just thinking about it!

    Hopefully by the time you read this any threat of snow will be gone … I’m pretty sure I heard that rotten weatherman say the dreaded S word this morning!

    Biscuits:

    • 2 C all-purpose flour
    • 1 T baking powder
    • 1/2 t salt
    • 3 T sugar
    • 1 stick butter, chilled
    • 2/3 to 3/4 C half and half

    Strawberries:

    • 1 quart strawberries
    • 1/3 C sugar
    • 1 T Balsamic

    If you want the ooky whipped cream:

    1 1/2 cups whipping cream for topping, or non-dairy whipped topping

    NOTE: Try to use the best balsamic possible. Not everything you buy in the supermarket is anything close to traditional balsamic. If you want to treat yourself to something wonderful, try the Traditional Balsamic from Fiore. Their products are really great … stay tuned for an ice cream with their Amarena Cherry Balsamic!

    Rinse the berries under cold water; drain well. Hull and slice the berries; place in a bowl. Sprinkle with the sugar and balsamic; cover and let stand at room temperature for about 1 hour.

    Whip the cream (sweeten with 2 or 3 tablespoons of sugar, if desired) until it holds a soft peak. Cover and refrigerate until ready to serve.

    Preheat the oven to 425.

    In a food processor combine the flour, baking powder, salt and sugar and pulse to mix. Cut butter into about 8 pieces and add to the mixture. Pulse until the mixture resembles coarse meal, but with few pea-size chunks of butter left in the mixture. Transfer the mixture to a large bowl and make a well in the center. With a fork stir in the cream, just until dough is moist.

    NOTE: Be very careful not to overwork the dough. The dough doesn’t hold together well at this point, but let the dough stand for a minute, and magic happens.

    Turn the dough out onto a lightly floured surface. Fold the dough over on itself (knead) 2 or 3 times, until it is holding together and is less sticky.

    Gently pat the dough into a 6 by 12-inch rectangle about 3/4-inch thick and cut into 8 (3-inch) biscuits with a floured round cutter. Transfer to a buttered foil-lined cookie sheet. Brush on a little milk or cream and sprinkle tops with some sugar, if desired. Bake for 10 to 15 minutes, until risen and golden brown.

    Split each biscuit horizontally. Top with about 1/3 cup of berry mixture. Replace the tops and top with a tablespoon or so of berries. Serve with whipped cream for topping.

    Serves 8.

    Buttered Rosemary Dinner Rolls #SundaySupper

    Another Sunday … another Sunday Supper Movement. This week hosted by Christie at A Kitchen Hoor’s Adventures. Stop by and check out her blog … scroll to the bottom and check out all of the Easy Easter Side Dishes

    It doesn’t get easier than these dinner rolls!

    When I have a large group over for a holiday – last Easter there were 12 of us – I try to simplify my menu as much as humanly possible. If you know me, that’s not easy!

    But, as I’ve gotten older, I’d like to think I’ve gotten wiser … at least about cooking! I used to have elaborate menus with fabulous, but complicated recipes. I’d be in the kitchen all day and a good portion of the time once my guests arrived. Dinner was fabulous, but I was exhausted and my kitchen looked like the Swedish Chef had cooked dinner.

    Now, I try to add in a few things (well, as many as possible) that can be made or prepped in advance.

    I sit and make a menu with a shopping list next to it, and next to that timing. If I can’t make the timing work something on the menu has to change.

    These dinner rolls are a savior! So easy and quick and because of the embellishments on top, it’s hard to know you did not bake them from scratch. I think this recipe came from Ree Drummond, but I don’t remember. Sorry!

    • 15 frozen, unbaked, un-risen dinner rolls
    • Melted butter
    • Coarsely chopped fresh rosemary
    • Coarse sea salt

    Place the dinner rolls in a large lightly buttered skillet, allowing some space between the rolls. Cover with a dish towel or cloth napkin and set aside in a warm place to rise for at least 2 to 3 hours.

    When risen, the rolls should be poufy and soft. Brush melted butter onto the rolls. Then sprinkle the rolls with chopped rosemary and sea salt.

    NOTE: I have also sprinkled thyme on the rolls. You can change up the herbs to whatever suits your fancy or menu.

    Bake (as instructions on the packet – usually 400 degrees F) for 15 to 20 minutes.

    NOTE: When you take them out of the oven they’re really puffy – sometimes over the top of the skillet. Once you let them sit for a few minutes they deflate a bit.

    Serve hot.

    Easy Easter Side Dishes

    Enticingly Easy Sides

    Scrumptious Salad Sides

    Sunday Supper MovementThe Sunday Supper Movement is committed to bringing our readers delicious recipes that encourage them to gather and eat together around the family table. Search for your favorite ingredients on our Sunday Supper website. Also check out the Sunday Supper Pinterest boards for plenty more ideas and inspiration.

    Would you like to join the Sunday Supper Movement? It’s easy. You can sign up by clicking here: Sunday Supper Movement.

    Ravioli di Ricotta

    Insane. I am telling you I am insane. Perhaps certifiably insane.

    Those of you who know me well are reading this and nodding your heads in agreement. I know. I have come to terms (mostly) with my insanity and am beginning to embrace it – as a southern woman would, gardening in big ugly hats, drinking see tea and having many cats. Being in Maine ones insanity eccentricity comes in a slightly different form – Bean boots, Allen’s Coffee Brandy (honestly, I have never had it and never will) and making maple syrup.

    When I gear up for the winter, I fill our house with wonderful ingredients, the Dear One fills it with firewood, I hang the window quilts I made, and I scour recipes for projects. Recipes I might not have as much time on my hands to try when the sun is shining and we’re puttering in the garden or working way too hard.

    This particular project started with a birthday gift from my dear husband – a pasta maker. We made fettuccine and spinach fettuccine – a dessert pasta may be on my list.

    And while this kept us occupied for a while, we wanted more. I have been making ravioli with my Mama for most of my life. She will undoubtedly say you only started helping in your 20s, but at this point in time, and at my age, that IS most of my life.

    I have ravioli forms that my mother gave me and they’re great, but I thought … we have this machine there must be an attachment to make ravioli. And there was! When my in-laws asked what we’d like for Christmas, without hesitation, we both said – a ravioli attachment for our pasta machine!

    It’s obviously taken some time for us to get to this point. I would look at it. It frightened me. I walked away. It sat staring at me, taunting me, daring me to try making ravioli with this machine.

    It snowed. I was bored. HEY! Let’s make ravioli!

    First the filling:

    • 1 pound fresh ricotta, drained if wet
    • Pinch of freshly grated nutmeg
    • 1 t freshly grated lemon zest (from about 1/2 a lemon)
    • 1 C freshly grated Parmigiano-Reggiano, plus more for serving
    • 1 large egg
    • Salt and freshly ground black pepper

    In a large bowl combine the ricotta, nutmeg, lemon zest, Parmigiano-Reggiano, and 1 egg. Season to taste with salt and pepper, stir well, and set aside.

    Now the difficult part, the ravioli dough:

    • 3 2/3 C all-purpose flour
    • 2 large eggs
    • 2 egg yolks
    • 1 T olive oil (optional)

    Mound the flour on a clean work surface and create a well in the center. Place the eggs, egg yolks, and oil (if using) in the center. Using a fork, whisk the eggs and oil together and slowly start dragging the flour into the egg mixture. Knead by hand until all the ingredients are well combined and the dough is smooth and elastic, about 10 minutes.

    (Alternatively, place all the ingredients in the bowl of a stand mixer fitted with a dough hook. With the mixer on medium speed, knead the dough until smooth and elastic, about 5 minutes.)

    NOTE: I was seriously lazy. I used the stand mixer. THIS SUCKED. No, really. It was terrible. I finally got it to the right consistency, but it took forever. More flour, more water, more oil. No more lazy.

    Wrap the dough in plastic wrap or place it in a covered bowl and let it rest at room temperature for at least 30 minutes.

    Set up a pasta machine and turn it to the largest opening. Cut off pieces of dough about the size of an egg. Working with one piece of dough at a time, roll the dough into sheets about 1/8-inch thick.

    NOTE: You start at zero, and with each pass through you raise the number. We went to #6

    Lay 1 pasta sheet flat on a lightly floured work surface and determine approximately where the halfway point is lengthwise.

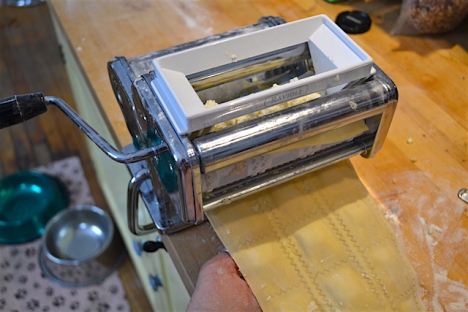
    Lay the pasta dough in the machine, folded edge on the roller, with the dough lying on either side of the machine. Turn crank 1/4 turn to start dough feeding.

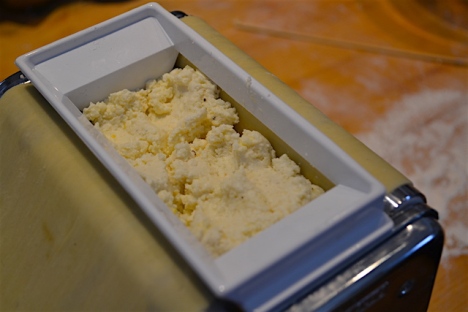
    Put the filling shoot into the machine and crank slowly. Keep adding filling as you crank the dough through the machine. Repeat and repeat.

    Let dry for 10-15 minutes and pull the ravioli apart and boil right away or let dry completely and freeze.

    The easiest way to do this is roll a sheet and fill – roll a sheet and fill – roll a sheet and fill.

    NOTE: Okay. These are the prettiest photos. The beginning part of this process was hell. Rolling the pasta sheets was difficult. Filling? Can’t even talk about it yet. But I keep finding filling in my hair. I used a ravioli/pasta/pastry cutter to help separate the ravioli.

    I’ve gone through all the trouble to make this ravioli, I need the perfect sauce. I scoured the internet and came across this sauce from Giada De Laurentiis. Her dish and ravioli was different, but I found the sauce intriguing.

    • 6 T unsalted butter
    • 2 T balsamic vinegar
    • 1/2 t salt
    • 1/4 t freshly ground black pepper
    • 1/3 C toasted, chopped walnuts
    • 1/4 C grated Parmesan

    Bring a large pot of salted water to a boil over high heat. Add the ravioli and cook, uncovered, at a gentle boil, 2 to 3 minutes, until tender but still firm to the bite, stirring occasionally. Drain ravioli.

    While the ravioli is cooking, in a medium sauté pan melt the butter over medium heat, stirring occasionally. When the foam subsides, and the butter begins to turn a golden brown, about 3 minutes, turn off the heat. Let cool for about 1 minute. Stir in the balsamic vinegar, salt, and pepper.

    Transfer the ravioli to the pan sauté pan with the balsamic brown butter. Gently toss. Sprinkle walnuts and cheese over the top. Serve immediately.