• ”my
    Award Winning Recipe Blogs - BlogCatalog Blog Directory
  • myTaste.com
  • Proud member of FoodBlogs
  • Ravioli di Ricotta

    Insane. I am telling you I am insane. Perhaps certifiably insane.

    Those of you who know me well are reading this and nodding your heads in agreement. I know. I have come to terms (mostly) with my insanity and am beginning to embrace it – as a southern woman would, gardening in big ugly hats, drinking see tea and having many cats. Being in Maine ones insanity eccentricity comes in a slightly different form – Bean boots, Allen’s Coffee Brandy (honestly, I have never had it and never will) and making maple syrup.

    When I gear up for the winter, I fill our house with wonderful ingredients, the Dear One fills it with firewood, I hang the window quilts I made, and I scour recipes for projects. Recipes I might not have as much time on my hands to try when the sun is shining and we’re puttering in the garden or working way too hard.

    This particular project started with a birthday gift from my dear husband – a pasta maker. We made fettuccine and spinach fettuccine – a dessert pasta may be on my list.

    And while this kept us occupied for a while, we wanted more. I have been making ravioli with my Mama for most of my life. She will undoubtedly say you only started helping in your 20s, but at this point in time, and at my age, that IS most of my life.

    I have ravioli forms that my mother gave me and they’re great, but I thought … we have this machine there must be an attachment to make ravioli. And there was! When my in-laws asked what we’d like for Christmas, without hesitation, we both said – a ravioli attachment for our pasta machine!

    It’s obviously taken some time for us to get to this point. I would look at it. It frightened me. I walked away. It sat staring at me, taunting me, daring me to try making ravioli with this machine.

    It snowed. I was bored. HEY! Let’s make ravioli!

    First the filling:

    • 1 pound fresh ricotta, drained if wet
    • Pinch of freshly grated nutmeg
    • 1 t freshly grated lemon zest (from about 1/2 a lemon)
    • 1 C freshly grated Parmigiano-Reggiano, plus more for serving
    • 1 large egg
    • Salt and freshly ground black pepper

    In a large bowl combine the ricotta, nutmeg, lemon zest, Parmigiano-Reggiano, and 1 egg. Season to taste with salt and pepper, stir well, and set aside.

    Now the difficult part, the ravioli dough:

    • 3 2/3 C all-purpose flour
    • 2 large eggs
    • 2 egg yolks
    • 1 T olive oil (optional)

    Mound the flour on a clean work surface and create a well in the center. Place the eggs, egg yolks, and oil (if using) in the center. Using a fork, whisk the eggs and oil together and slowly start dragging the flour into the egg mixture. Knead by hand until all the ingredients are well combined and the dough is smooth and elastic, about 10 minutes.

    (Alternatively, place all the ingredients in the bowl of a stand mixer fitted with a dough hook. With the mixer on medium speed, knead the dough until smooth and elastic, about 5 minutes.)

    NOTE: I was seriously lazy. I used the stand mixer. THIS SUCKED. No, really. It was terrible. I finally got it to the right consistency, but it took forever. More flour, more water, more oil. No more lazy.

    Wrap the dough in plastic wrap or place it in a covered bowl and let it rest at room temperature for at least 30 minutes.

    Set up a pasta machine and turn it to the largest opening. Cut off pieces of dough about the size of an egg. Working with one piece of dough at a time, roll the dough into sheets about 1/8-inch thick.

    NOTE: You start at zero, and with each pass through you raise the number. We went to #6

    Lay 1 pasta sheet flat on a lightly floured work surface and determine approximately where the halfway point is lengthwise.

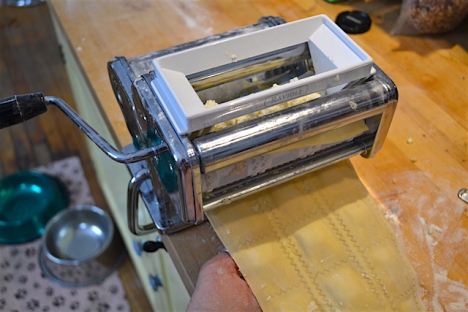
    Lay the pasta dough in the machine, folded edge on the roller, with the dough lying on either side of the machine. Turn crank 1/4 turn to start dough feeding.

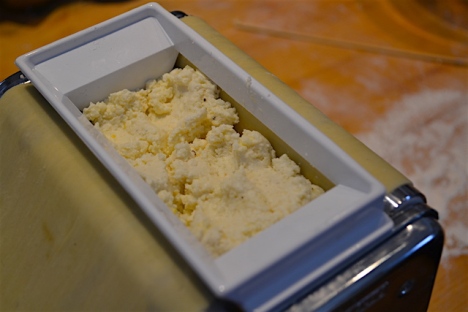
    Put the filling shoot into the machine and crank slowly. Keep adding filling as you crank the dough through the machine. Repeat and repeat.

    Let dry for 10-15 minutes and pull the ravioli apart and boil right away or let dry completely and freeze.

    The easiest way to do this is roll a sheet and fill – roll a sheet and fill – roll a sheet and fill.

    NOTE: Okay. These are the prettiest photos. The beginning part of this process was hell. Rolling the pasta sheets was difficult. Filling? Can’t even talk about it yet. But I keep finding filling in my hair. I used a ravioli/pasta/pastry cutter to help separate the ravioli.

    I’ve gone through all the trouble to make this ravioli, I need the perfect sauce. I scoured the internet and came across this sauce from Giada De Laurentiis. Her dish and ravioli was different, but I found the sauce intriguing.

    • 6 T unsalted butter
    • 2 T balsamic vinegar
    • 1/2 t salt
    • 1/4 t freshly ground black pepper
    • 1/3 C toasted, chopped walnuts
    • 1/4 C grated Parmesan

    Bring a large pot of salted water to a boil over high heat. Add the ravioli and cook, uncovered, at a gentle boil, 2 to 3 minutes, until tender but still firm to the bite, stirring occasionally. Drain ravioli.

    While the ravioli is cooking, in a medium sauté pan melt the butter over medium heat, stirring occasionally. When the foam subsides, and the butter begins to turn a golden brown, about 3 minutes, turn off the heat. Let cool for about 1 minute. Stir in the balsamic vinegar, salt, and pepper.

    Transfer the ravioli to the pan sauté pan with the balsamic brown butter. Gently toss. Sprinkle walnuts and cheese over the top. Serve immediately.

    Maple Syrup

    Before I start … dear friend, dear, dear friend, I can see you from here, pixie with the flame red hair, hanging your head and groaning. This certainly falls under the ‘Ernie Wonders Why!?’ category. Read on …

    Maine winters are tough. And long. And cold. Long and grey. Long and dreary. Did I mention long?

    This winter has been particularly harsh. Though, truth be told, the harshness started at the end of FEBRUARY! You know, that point in the winter season when snow should be melting, wistfully waiting for the first crocus to peer it’s little head out of the ground. This winter NOT SO MUCH.

    We have had nor’easter after nor’easter dumping FEET of snow at a time.

    This is the point in time when we look outside, seeing nothing but snow, we try to find some project to occupy ourselves. I’ve knit enough. I am cooked out (HA!), crafted out. The Dear One has made enough noise and dust in the shop and is at a stopping point in construction.

    We thought our salvation had come while running errands in Vermont a few weeks ago, we saw a maple syrup making kit. Light bulbs went off, eyebrows raised, glances shared, this may just be the thing to beat the winter blues. Did we buy it? NO! It was expensive. They didn’t have taps, just tubing, and we left that big box of hope on the shelf. Disappointment all around. The thought of tapping our own trees kept rolling in our minds on that quick 8 hour drive home.

    Maple Syrup. Maple Syrup. What did (maple syrup) you say, dear? Maple Syrup. What do we need (maple syrup) from the store. Would you like chicken (maple syrup) for dinner tonight? See?

    We finally had a (short) reprieve from the bitter cold … actually crawled up to 40! Hmmm … sap runs on warm days. Honey, says the Dear One, let’s give maple syrup a whirl! YAY!

    Off to the store I went and we purchased 1 drill bit, 4 pails for gathering the sap, 4 spiles (taps with hooks), 1 lid, 3 disposable lasagna pans, 1 very large steam pan, 1 5 gallon bucket.

    The Dear One built a fire pit outside for the fire, gathered some wood for the fire – we used various conifer trees that we had cut dow, surely we’re not using the wood for the wood stove for this! Just outside the front door there is a cinderblock base, with a piece of grating on top, a pan on top of that, an old chair from the elementary school, various coolers filled with varying amounts of sap. It looks like Appalachia out there … or a war zone …

    Ready, set, go!

    Or so we thought.

    We picked the 4 maple trees for their closeness to each other, the fire and the house. In hindsight, trees easier to get to in case you get walloped with 2 feet of snow is probably a good thing. 2 of these trees involved a short walk up the driveway, across a gully with a steep edge and slogging.

    The Dear One drilled the holes and we hung the pails. Sap started dripping into the buckets almost immediately. The lid in the above photo is not ideal, though it will happily be sold to you for ridiculous amount of money. The wind blows it open. Falling snow and ice shifts the lid. The disposable lasagna pans I bought can be moulded to the pail and stay in place much better – and they cost $1.99 for 3 of them.

    So, as the sap drips we kept an eye on the pails. We emptied the pails into the bucket – as you can see, Bob helped too!  As an aside, just as we were about to begin to boil – WHAM – snow. We poured the sap into 3 small coolers and one large cooler, put them in the shade in a snow bank and hunkered down – again!

    Next step – build a fire. You need dry wood. Lots and lots of dry wood. Lots and lots of dry wood. Our first attempt at fire didn’t work so well. So bad in fact, that sap was going to be dumped and things were being kicked around the yard. We decided to give up and be prepared for this next year. But just as I was about to start cleaning out ALL the coolers, buckets, pans, etc., The Dear One had a Wylie Coyote moment and found a cache of dry spruce and built a roaring fire. Well, perhaps we were off to the races after all!

    You pour the sap into the pan. It’s a little disheartening. It’s clear. It’s water. It tastes like nothing. I was hoping for a hint of something. A soupçon. Nope. Nothing. Sigh. You know you’re going to be feeding this fire for a long, long time, you just hope the end result looks and tastes more like maple syrup than this beginning.

    And you wait for a boil (and drink beer).

    And feed the fire.

    And wait for a boil (maybe Allen’s Coffee Brandy is better).

    And feed the fire.

    And wait for the boil (where’s the bourbon).

    Suddenly, in between your 3rd or 4th time of feeding the fire (and drinks) the sap boils! You start to do a dance around the fire reminiscent of Max and the Monsters in The Wild Things. It boils down, you add more sap, comes to a boil (dance some more), it boils down (feed the fire), you add more (sip of drink) sap, comes back to a (dance, dance, dance) boil, feed the fire (almost forgot that for a moment and the fire NEARLY went out), AND REPEAT many, many times (wait, check the pails some more)!

    You’re waiting – well, in our case, to use up the sap we had on hand – for a color and a certain viscosity and, truth be told, we have NO clue whatsoever what we’re waiting for – perhaps Godot).

    We punted. It was cold. It had been HOURS. All our sap was in the pan boiling. There were no more snacks or beer. The sun was setting. We made the executive decision that this was good enough. It most likely should have boiled longer.

    Now you pour the molten hot sap/syrup through a strainer that is really just a gigantic coffee filter and into a big pot. Did I mention hot? Hot fire. Hot pan. Hot liquid.

    Into the house now for the 2nd boil. You’re trying to get to a soft ball stage – or as one of Mr. Google’s friends said – 7 degrees above boiling water for your elevation. Really? Just give me a number, a temperature. I’m exhausted. At this point, I hate this project. I hate maple trees. I smell like Smokey the Bear. I’m nearly blind from the smoke and soot in my eyes. AND THERE’S STILL MORE TO DO!

    This sap/syrup needs to be boiled down more. You want that amber color. You want it to coat the back of a spoon. You want to watch it like a hawk – as the friends of Google instructed – because one second too long and your 8 hours of agony could be ruined. As with the outside boil, this probably should have gone on a bit longer as well.

    Not being able to stop myself, I made my toil linger. I decided once I reached the right temperature and thickness, I was going to then ‘can’ the syrup so it would last. I’m not sure I needed to do this and there are opposing views on whether this step was necessary, but I thought why tempt fate!? And besides, at this point I am delirious and I could have moved Cadillac Mountain to Canada as long as I could shower!

    In the end 20 gallons of sap made 3 pints of maple syrup. Sigh! Stop laughing, Ernestine.

    What we’ve learned:

    • Have lots of dry wood.
    • Make sure the Dear One has had plenty of sleep.
    • Make sure there’s a lot of beer and snacks.
    • Start early.
    • Get two chairs to sit by the fire – not that you can figure out where to put the chairs so smoke doesn’t go in your eyes.
    • More beer (a suggestion by the Dear One)
    • Build a sugar shack!
    • Let it boil outside longer
    • Let it boil inside longer
    • GO TO THE STORE AND BUY MAPLE SYRUP!!

    Yes, Ernie, I know. They sell real maple syrup in the store. Even my Dad said, have you heard of Log Cabin?

    Truthfully, nothing beats this taste! The flavor is totally worth the agony.

    We’re waiting for it to warm up a bit. We’re going to do this one more time. What can I tell you? It must be like child birth. You forget the pain and agony. If you didn’t why would people do these things more than once!

    Oven-Roasted Fiddleheads with Capers and Lemon #SundaySupper

    Another Sunday … another Sunday Supper Movement. This week hosted by Christie at A Kitchen Hoor’s Adventures. Stop by and check out her blog … scroll to the bottom and check out all of the Healthy Green Recipes for St. Patrick’s Day.

    I will admit from the outset, that this recipe has been sitting on my to-do list since last spring. I’ve just had a hard time sitting in front of this computer and writing. Seeing this week’s theme jolted me into, Come on, girl, get off yer are and write. So here I am.

    Besides, it’s cold here in Maine. I am longing for springtime. Remembering this recipe and the lovely spring day I found these green beauties makes me warm and happy. Perhaps by you, the little fiddleheads are pushing through the ground as you read.

    Fiddleheads are the young unfurled fronds of ferns that pop their little heads out of the ground in the spring. Usually an Ostrich Fern. You harvest them in the spring before they unfurl and are close to the ground. This involves a lot of tramping around – well, treading lightly around the woods, peering on the ground for these little prized gems. Usually under or near trees, so they’re in a cool-ish, damp-ish place. You cut close to the ground and try not to take too many from the same cluster so as not to kill the fern – we’ll want more next year, right?

    They are high in omega- 3 and omega-6 fatty acids, and high in iron and fiber and potassium.

    They are fiddly to clean – hahaha, get it? Fiddleheads? Fiddly? – oh, I crack myself up. Cutting off the bottom, peeling the brown papery stuff and soaking, and soaking, and soaking.

    But once soaked they look like this:

    Cool, right? And a little weird.

    I wanted the preparation method to be light as the flavor of the Fiddlehead is delicate. They taste like spring-time, a little grassy, a little nutty, a bit like an asparagus. and I think a bit like an artichoke.

    • cups fiddleheads
    • tablespoons capers
    • tablespoons fresh lemon juice
    • tablespoon extra virgin olive oil
    • 1/4teaspoon sea salt
    • 1-2 thin lemon slices

    NOTE: I left the capers out. Someone here has an issue with capers. I’m not quite sure what or shy, but for marital harmony, I left them out.

    Preheat oven to 450 degrees.

    Wash fiddleheads thoroughly, in at least 2-3 changes of water. Trim away any brown, woody ends of fiddlehead stems.

    Bring a medium pot of water to a boil and blanch fiddleheads for 5 minutes. Drain and plunge into an ice water bath to stop cooking.

    Drain thoroughly and toss with lemon juice, olive oil, capers, salt and lemon slices.

    Spread onto a parchment lined baking sheet and roast for 8-12 minutes, until lightly browned and crisp around the edges.

    Healthy Green Foods for St. Patrick’s Day

    Healthy Green Main Meals

    Super Green Side Dishes

    Sunday Supper MovementThe Sunday Supper Movement is committed to bringing our readers delicious recipes that encourage them to gather and eat together around the family table. Search for your favorite ingredients on our Sunday Supper website. Also check out the Sunday Supper Pinterest boards for plenty more ideas and inspiration.

    Would you like to join the Sunday Supper Movement? It’s easy. You can sign up by clicking here: Sunday Supper Movement.