• ”my
    Award Winning Recipe Blogs - BlogCatalog Blog Directory
  • myTaste.com
  • Proud member of FoodBlogs
  • Ravioli di Ricotta

    Insane. I am telling you I am insane. Perhaps certifiably insane.

    Those of you who know me well are reading this and nodding your heads in agreement. I know. I have come to terms (mostly) with my insanity and am beginning to embrace it – as a southern woman would, gardening in big ugly hats, drinking see tea and having many cats. Being in Maine ones insanity eccentricity comes in a slightly different form – Bean boots, Allen’s Coffee Brandy (honestly, I have never had it and never will) and making maple syrup.

    When I gear up for the winter, I fill our house with wonderful ingredients, the Dear One fills it with firewood, I hang the window quilts I made, and I scour recipes for projects. Recipes I might not have as much time on my hands to try when the sun is shining and we’re puttering in the garden or working way too hard.

    This particular project started with a birthday gift from my dear husband – a pasta maker. We made fettuccine and spinach fettuccine – a dessert pasta may be on my list.

    And while this kept us occupied for a while, we wanted more. I have been making ravioli with my Mama for most of my life. She will undoubtedly say you only started helping in your 20s, but at this point in time, and at my age, that IS most of my life.

    I have ravioli forms that my mother gave me and they’re great, but I thought … we have this machine there must be an attachment to make ravioli. And there was! When my in-laws asked what we’d like for Christmas, without hesitation, we both said – a ravioli attachment for our pasta machine!

    It’s obviously taken some time for us to get to this point. I would look at it. It frightened me. I walked away. It sat staring at me, taunting me, daring me to try making ravioli with this machine.

    It snowed. I was bored. HEY! Let’s make ravioli!
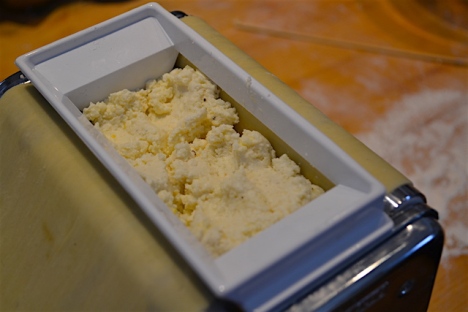
    First the filling:

    • 1 pound fresh ricotta, drained if wet
    • Pinch of freshly grated nutmeg
    • 1 t freshly grated lemon zest (from about 1/2 a lemon)
    • 1 C freshly grated Parmigiano-Reggiano, plus more for serving
    • 1 large egg
    • Salt and freshly ground black pepper

    In a large bowl combine the ricotta, nutmeg, lemon zest, Parmigiano-Reggiano, and 1 egg. Season to taste with salt and pepper, stir well, and set aside.

    Now the difficult part, the ravioli dough:

    • 3 2/3 C all-purpose flour
    • 2 large eggs
    • 2 egg yolks
    • 1 T olive oil (optional)

    Mound the flour on a clean work surface and create a well in the center. Place the eggs, egg yolks, and oil (if using) in the center. Using a fork, whisk the eggs and oil together and slowly start dragging the flour into the egg mixture. Knead by hand until all the ingredients are well combined and the dough is smooth and elastic, about 10 minutes.

    (Alternatively, place all the ingredients in the bowl of a stand mixer fitted with a dough hook. With the mixer on medium speed, knead the dough until smooth and elastic, about 5 minutes.)

    NOTE: I was seriously lazy. I used the stand mixer. THIS SUCKED. No, really. It was terrible. I finally got it to the right consistency, but it took forever. More flour, more water, more oil. No more lazy.

    Wrap the dough in plastic wrap or place it in a covered bowl and let it rest at room temperature for at least 30 minutes.

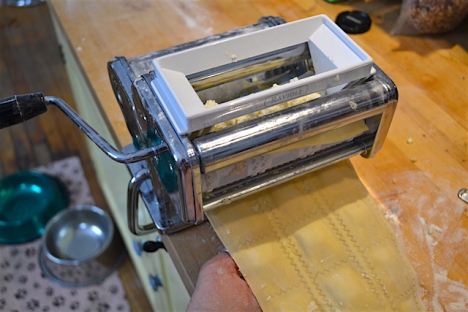
    Set up a pasta machine and turn it to the largest opening. Cut off pieces of dough about the size of an egg. Working with one piece of dough at a time, roll the dough into sheets about 1/8-inch thick.

    NOTE: You start at zero, and with each pass through you raise the number. We went to #6

    Lay 1 pasta sheet flat on a lightly floured work surface and determine approximately where the halfway point is lengthwise.

    Lay the pasta dough in the machine, folded edge on the roller, with the dough lying on either side of the machine. Turn crank 1/4 turn to start dough feeding.

    Put the filling shoot into the machine and crank slowly. Keep adding filling as you crank the dough through the machine. Repeat and repeat.

    Let dry for 10-15 minutes and pull the ravioli apart and boil right away or let dry completely and freeze.

    The easiest way to do this is roll a sheet and fill – roll a sheet and fill – roll a sheet and fill.

    NOTE: Okay. These are the prettiest photos. The beginning part of this process was hell. Rolling the pasta sheets was difficult. Filling? Can’t even talk about it yet. But I keep finding filling in my hair. I used a ravioli/pasta/pastry cutter to help separate the ravioli.

    I’ve gone through all the trouble to make this ravioli, I need the perfect sauce. I scoured the internet and came across this sauce from Giada De Laurentiis. Her dish and ravioli was different, but I found the sauce intriguing.

    • 6 T unsalted butter
    • 2 T balsamic vinegar
    • 1/2 t salt
    • 1/4 t freshly ground black pepper
    • 1/3 C toasted, chopped walnuts
    • 1/4 C grated Parmesan

    Bring a large pot of salted water to a boil over high heat. Add the ravioli and cook, uncovered, at a gentle boil, 2 to 3 minutes, until tender but still firm to the bite, stirring occasionally. Drain ravioli.

    While the ravioli is cooking, in a medium sauté pan melt the butter over medium heat, stirring occasionally. When the foam subsides, and the butter begins to turn a golden brown, about 3 minutes, turn off the heat. Let cool for about 1 minute. Stir in the balsamic vinegar, salt, and pepper.

    Transfer the ravioli to the pan sauté pan with the balsamic brown butter. Gently toss. Sprinkle walnuts and cheese over the top. Serve immediately.

    Perfect Roast Chicken

    DSC_1069

    This is so much less about roasted chicken than it is about chicken in general.

    Really, once you’ve roasted one or two chickens, you have the basics down pat and there isn’t much to change aside from herbs and citrus and, perhaps, what you roast around it.

    My fall back recipe – as I cannot for the life of me keep oven temperatures or timing in my head – is an oldie but a goodie, from the Barefoot Contessa Cookbook by Ina Garten. I admit. I’m boring. I stuff a head of garlic that I cut in half horizontally, a lemon that I cut in half, and whatever fresh herbs I have around inside the chicken. I liberally sprinkle with kosher salt and pepper, and Bob’s your uncle. Potatoes, carrots and onions around the chicken. Completely fix it and forget it.

    As most of you know, I am now living in DownEast Maine – and why is it called downeast Maine? Well, I’ll tell ya! Coastal schooners laden with goods for Portland and other Maine ports would leave Boston, Massachusetts keeping their compass headings generally east or northeast, hoping that the prevailing wind from the westerly quadrants would stay behind them. Hence, they sailed downwind in an easterly direction. Hence, they were traveling down east. Things are very different here.

    And you must be wondering why, if I don’t really use a roasted chicken recipe am I prattling on about roasted chickens and living on an island off the coast of Maine.

    El Dia de la Pollo Muerto … the day of the dead chickens.

    A some of our friends once a year purchase chicks. They’re so very cute when they’re little. We would go over and look at them, watch them grow. I would wonder why, unlike the laying birds that are free range, these chicks were penned. Seems you can have either laying chickens or eating chickens.  They raise a bunch of eating chickens. Once they’ve been tended to and loved and fattened up … well, el dia de la pollo muerto.

    HORRIFYING! I know! Growing up in the big city, while you try to be conscientious about how animals are being raised and what they’re being fed, you don’t necessarily give much though to the in between raising and purchasing/eating.

    Around November, the Dear One and some of our friends get together and – to quote the Queens of Hearts – off with their heads.

    I have been invited to attend this gala event. I have politely declined, trying not to make the squelched up face I’m making as I type. ‘They’ say it’s quick and painless (let’s ask the chicken that!) and rather quick to go from live chicken to ready to eat. I don’t know the actual process, but there are beheadings, and contraptions that look like dryers that do the defeathering, and the descriptions just get worse from there.

    My last conversation with our friend MG went something like this –

    MG: You should come. It’s great. Fascinating to watch.
    ME: Are you kidding? No way, no how, no time.
    MG: Oh, it’s not so bad. Quick.
    ME: Well, what time do you start? But DON’T count on it. And I’m not helping
    MG: ME? No, no, no, no. I don’t go. I can’t bear it.

    Seriously, Dude?

    So I stay home. Thinking good thoughts for the poor little chickens giving so much of themselves for my roasting pan, and convince myself that the chickens going to my freezer are all from the grocery store. You see, the one request with these 8-10 incredible chickens that come into the house … no feet, no heads, no feathers, no guts, and please put them in plastic bags so I can pretend there was just a fantastic sale on chickens.

    I do wonder if the laying hens feel guilty. There they are, well fed, out all day playing in the sun with the turkeys and guinea fowl, goats (meanest little creatures ever born), and the pig, Kevin. Why are they safe? Are they to be next? One will never know the mind of a chicken.

    That being said, these are probably the best chickens I have even eaten. Cooked here only for those deserving, chosen few.

    This past go round, I was honored with a big bag of chicken livers and skin … pate and cracklings … more no that later.

    • 1 (5 to 6 pound) roasting chicken
    • Kosher salt
    • Freshly ground black pepper
    • 1 large bunch fresh thyme, plus 20 sprigs
    • 1 lemon, halved
    • 1 head garlic, cut in half crosswise
    • 2 tablespoons (1/4 stick) butter, melted
    • 1 large yellow onion, thickly sliced
    • 4 carrots cut into 2-inch chunks
    • 1 bulb of fennel, tops removed, and cut into wedges
    • Olive oil

    NOTE: I skip the melted butter, use whatever fresh herbs I have around, and substitute potatoes for the fennel.

    Preheat the oven to 425 degrees F.

    Remove the chicken giblets. Rinse the chicken inside and out. Remove any excess fat and leftover pin feathers and pat the outside dry. Liberally salt and pepper the inside of the chicken. Stuff the cavity with the bunch of thyme, both halves of lemon, and all the garlic. Brush the outside of the chicken with the butter and sprinkle again with salt and pepper. Tie the legs together with kitchen string and tuck the wing tips under the body of the chicken. Place the onions, carrots, and fennel in a roasting pan. Toss with salt, pepper, 20 sprigs of thyme, and olive oil. Spread around the bottom of the roasting pan and place the chicken on top.

    Roast the chicken for 1 1/2 hours, or until the juices run clear when you cut between a leg and thigh. Remove the chicken and vegetables to a platter and cover with aluminum foil for about 20 minutes. Slice the chicken onto a platter and serve it with the vegetables.

    Lamb Chops on the Grill

    When a dear friend calls and says, ‘Would you cook for me? I really feel like lamb. I’ll even pick up the lamb.’ How can you say no?

    The original plan was for rack of lamb, but we finally had a day with a break in the heat. The grill and eating outside was really the way to go. Change plans. Racks out. Chops in. Good thing I really am an adaptable gal.

    Now comes the agonizing part … at least for me … marinade. I needed a theme for the meal, at least a direction. I mean, how can you decide what to serve with all of this without picking a marinade flavor profile. Everything else has to follow suit.

    Pouring through the books on my bookshelves, I came across Ina Garten’s recipe for lamb kabobs in the Barefoot Contessa at Home. The recipe had a decidedly Mediterranean slant, Greek even, so it was off to the races!

    I modified the recipe from kabobs to chops and it was fabulous … if I do say so myself!

    • 16 loin lamb chops
    • 2 T minced garlic
    • 2 T minced fresh rosemary leaves
    • 4 t minced fresh thyme leaves
    • 1/2 C mild olive oil
    • 1/2 C dry red wine
    • 4 T red wine vinegar
    • 1 t Kosher salt

    NOTE: Use whatever amount of lamb chops you’d like. This fed 3 hungry people with leftovers! I would think 2 or 3 chops per person … they’re so tiny!

    Place the chops in a glass dish – I used a 9×11 Pyrex.  Season the chops with salt and pepper. Whisk together the garlic, rosemary, thyme, olive oil, red wine, vinegar, and 1 teaspoon of salt in a medium bowl. Pour over the chops. Cover with saran wrap and let marinate for a few hours or over night.

    You can either – heat a charcoal grill with coals and spread the coals in 1 tight layer on the grill.  Or use a gas BBQ. Whichever way you go, make sure not to over cook these little beauties. They go from almost done to over done in seconds.

    I served this with hummus and pita chips to start, lemony potatoes, fatoush salad and tzatziki. YUM! The rest of the recipes to follow!